- Details
- Written by: INsane
- Category: Day of Defeat Player Guides
- Hits: 17075


There are adjustments (INsane 2019) to the 2003 manual to upgrade some images and added Hints.
Consider this page under construction in September -October 2019. INsane.
Day of Defeat is a World War II multiplayer game driven by the Half-life engine. DoD attempts to recreate WWII battles in both fictional and non-fictional environments - the game puts you in the shoes (rather, combat boots!) of a British, American or German soldier circa 1944, Western Europe.
Day of Defeat is a class-based, first-person shooter -- upon arrival in game, you will have the choice to play different types of soldiers -- from Rifleman to Machinegunners, to Snipers. Each class has its own mix of special abilities and weapons.
The overall goal of the game depends upon the map; whether it be to capture an area, defend a beach, or simply destroy the enemy. The 15 maps included with Day of Defeat will give players endless hours of replayability online. With a selection of nearly 34 weapons, players will have something new to try every time they play.
So for now, grab your helmet and rifle and prepare for the most immersive WWII game to date!
1. Controls
2. The HUD
3. The VGUI
4. Bipods and Machineguns
5. Gameplay Types
6. Scoring
7. Maps
8. Classes and Weapons
Once you’ve downloaded and installed Day of Defeat, you’ll need to configure your controls before you play. Simply select ‘Options’ from the main menu, then the ‘Keyboard’ tab sub-menu.
Most of the controls are fairly standard to First-person Shooters, so those need no explanation. The following is a brief explanation of controls unique to Day of Defeat...
This feature will allow you to communicate with others ingame using a microphone. Hold down this key and speak into the mic - those on your team will be able to hear you. Using this ability truly raises the levels of communication, teamplay, and fun. Voice communication will be setup during the installation of Day of Defeat.
This will bring up DoD’s in-game menu, useful for many things including Voice commands and Hand Signals. See the VGUI section for more information.
Brings up a quick selection of voice commands. Each selection will activate the associated voice signal and hand signal for that command.
New to DoD is the ability to drop your primary weapon and pick up other dropped weapons by running over them. This ability comes in very handy when you run out of ammo or find that the situation calls for automatic weapon as opposed to the rifle you currently have. Some maps require that you pick up a rocket weapon (Bazooka, Panzerschreck, or Piat) in order to destroy objectives - you'll need to drop your primary weapon to pick up the rocket weapon.
A useful feature that lets you pass ammunition to a teammate. Any class can share ammo with any other class. Make sure to keep your teammates using a Machine Gun well stocked.
This ability allows you to drop items that are important to completing a levels objective, such as satchel charges or documents, to other teammates.
In addition to crouching, users can ‘prone’ - basically meaning they lay on the ground. Machine Gunners can deploy their bipod only when prone. (Or when in an MG Nest area.) A user’s weapon will become temporarily disabled while ‘going prone’ or standing back up.
Holding down this key will give you a burst of speed. As you sprint, your stamina will drain quickly, so sprinting is only recommended in sticky situations.
Many weapons have a secondary attack option. Secondary attack with an infantry rifle will stab with its bayonet or use the rifle butt as a melee attack, while secondary attack with MG’s will deploy the bipod. (Only when prone, or in an MG nest) Secondary attack using any sort of scoped weapon will activate it’s scope.
If a grenade lands at your feet, you may pick it up and throw it back by using this key. Watch out, though - grenades have a fuse of 5 seconds, and will go off in your hand if you aren’t careful!
The overview and mini maps will provide you with a map of the level you are playing. These are very useful to help orient yourself to the objectives as well as teammates in addition to providing you with the layout of the level. Your icon is surrounded by white and is slightly larger than your teammates icons that are surrounded in black. By pressing the map key the first time, the full screen overview will come up. Press the key a second time and the overview will switch to the mini-map. You can also zoom in and out of the mini-map by defining the mini-map zoom key.
Places the currently selected map marker icon on the minimap. To select where to place the icon, move your crosshair over the location while looking around in the world and hit the 'place map marker' key.
Selects the next map marker icon in the list. The current icon will be displayed on the HUD.
Selects the previous map marker icon in the list. The current icon will be displayed on the HUD.
Day of Defeat has a graphical HUD that displays useful information such as Objective Status, ammunition, reinforcement times, etc. The following provides a brief explanation for each part of the HUD...

Lets you know who is in possession of what flags or objectives, including ‘neutral’ flags displayed as gray. Area capture flags will slowly change colors as they are being captured. Standing in a capture zone will slowly change the flag of that zone to your side. Some area captures require more than one person to capture. When this is the case, the icon associated to the flag/objective in the Objective Status (1) will show a #/# indicator to show you how many players you have versus how many you need. So 1 person at a flag/objective that requires 2 people will display 1 / 2 under its icon.
Let’s you know that you are in an ‘Area Capture Zone.’ In addition to the Area Capture icon, a ‘Plant the Explosive’ icon will come up when you have a TNT bundle or satchel charge and are near a destroyable object.
Let’s you know that you are in an area that allows you to deploy your bipod while standing. This will work only for a weapon with a bipod. These nests are usually found near bunkers, sandbag walls, and window sills.
This area is reserved for map messages and chat messages.
A graphic display of how much stamina your player currently has. Actions such as sprinting and jumping reduce your stamina. Stop moving to regain your stamina.
A graphic display of a player’s current health. Health cannot be recharged like stamina can.
The middle dot represents where you are aiming. The distance of the 'legs' of the crosshair from the central dot gives a rough estimation of how accurate your fire will be. Movement will decrease your accuracy - stand still to achieve the best results. Zooming with a sniper rifle and deploying the bipod of a Machinegun will dramatically increase your accuracy as well.
With the overview map in mini-map mode, you can still play but also find your way around the map and see the location of teammates.
A graphic representation of the number of clips left in your inventory, not including the clip that is currently loaded.
Number of rounds left in your current clip.
The VGUI is a useful menu system in DoD that allows you to do a number of things while playing the game. The following is a short description of each VGUI item...

Gives you specific information about your current server, map, and class.
Allows you to change your current player class. You will use the new class on your next respawn. (Death)
Allows you to change your current team. Changing teams results in an instant respawn.
Lets you select from a series of voice commands to use. Some of these will also result in your player using hand signals.
These accomplish the same thing as the Voice Commands, but without the shouting. A useful tactic when stealth is required.
At first glance, the use of a bipod may seem a bit tricky. The following is a quick run through of how to use weapons with bipods effectively.
All three Machine Guns are horribly inaccurate unless they are deployed. To deploy a machinegun:
Go prone with the ‘prone’ key.
Deploy your bipod with the ‘secondary fire’ key.
A short animation will play, and you will be ready to rock. While deployed, a player cannot move, and has only a limited viewing range. Undeploy your bipod using the ‘secondary fire’ key in order to move again.
Machine Guns can only be reloaded if the bipod is deployed. Rifles with bipods (Such as the BAR, BREN, and FG42) can be reloaded at any time.
Machine Guns can also be used while standing in certain areas of most maps. These areas are called ‘MG Nests’, and a small graphic will pop up in your HUD to indicate you are in a nest. See the HUD section to view the MG Nest graphic. Once in an MG nest, a player can deploy his bipod while standing.
You will find that Machine Guns run out of ammo very quickly. Since the Machine Gunners have no secondary weapons, this can be a major problem. To alleviate this, you will need to ask your teammates to pass ammunition. Everyone carries an extra clip of ammo and they can drop this to you using the ‘Drop Ammo’ key.
The variety of maps that come with DoD cover a number of different gameplay types (Gameplay meaning the general setup, or rules, of the game.) However all feature DoD’s signature ‘Wave Reinforcement’ system. After joining a game, choosing a side and player class, the player will ‘spawn’, ready for combat. With ‘Wave Reinforcement’ gameplay, upon a death, the player will be placed in a ‘Reinforcement’ pool. The reinforcement timer is started by the first player who is killed. Any other players who are killed join that players timer until it runs out and then the whole pool will ‘respawn’( return to the battle) together. This system provides for players to continue playing without any large amounts of downtime as well as encouraging teamwork.
This gameplay type involves the capturing of flags spread throughout the map. Some flags can be captured by simply running over them. Other flags are ‘Area Capture’ – meaning that they can be captured simply by standing in a zone around the flag. Certain Area Capture zones will require more than one team member to capture. Once enough players are present in a flag zone, that flag will slowly change to their control.
In these maps the players must perform a specific task in order to ‘win’ the map. This task can be anything from destroying an 88mm flak cannon, to capturing a fuel truck. Each team will spawn in a specific area, and will be given instructions on what their task is. In some cases both teams will have objectives to attend to. In other cases, 1 team is on the offensive trying to accomplish their goal and the other is on the defending side trying to prevent that from happening. In these cases the team on the offensive will have a time limit to perform their job and if that limit expires, the defending team will win.
When an objective needs to be destroyed, an item such as a satchel charge will need to be taken to that object. Stay near the objective for a few seconds to set the timer. Once the timer is set, large red numbers will count down near the object and then it will explode so clear out. In objective maps with rocket weapons, the rockets can be used to destroy the objective in addition to Satchel charges if they are present.
Scoring in Day of Defeat depends on the map played. Be sure to read the mission briefing to determine the scoring system for a particular map.
Scoring is based on the following criteria:
Teams gain points for completing all objectives. Individuals get points for any participation in completing an objective.
The team receives 1 point per flag captured and one point per flag to the individual who touched it. A team receives 50 points for capturing the entire map.
Individuals typically receive 10 points per objective completed. Players can also receive points for dropping ammo to other players. For teams, the scoring for these maps usually ends up all or nothing -- the team to complete all objectives wins the full 50 points.
Page Hint: Click on the image to enlarge (images with a magnifying glass icon)
Fast paced and balanced map US and Axis standard teams, 5 flags and 2 of the centre maps are a 2 player capture -The Plaza and The Bridge.
The Bridge and Plaza are the key, considering the other 3 flags are quick to take you must hold both the Bridge and Plaza as a priority to win.
The underground paths from the Bridge to the Street and under the plaza area are great alternatives as is the route through the buildings from the Plaza to the Laundry (allied first flag).
Hint: Hold the 2 player caps at The Plaza and Bridge at all costs.
Best Sturmbot waypoints (INsane's 2019 opinion): Martee's 2019 set (9KB) this set fixes a lot of issues previous sets had like bots getting stuck.
The Version 1.7 file (12kb) its a close second between the two but marteew's set is best I have played so far for a local LAN.
Waypoint Hint: Avoid older waypoints like the 11KB file in Sturmbot version 1.6 or older, bots have issues around doors, stairs and it seems like this one is in most packs (including mine) as it was the version 1.6 official file. Server size is what suits you, I found a 16 player server OK, 32 players is hectic but fun too.
 |
 |
| dod_anzio - The flag overview (Click to enlarge) | dod_anzio - Routes on the minimap (Click to enlarge) |
 |
 |
 |
 |
 |
|
The Bridge Right of Allied Spawn 2 player cap 3 seconds. |
The Hill Centre exit near Axis spawn 1 player cap 1 second. |
The Laundry Left of Allied spawn 1 player cap 1 second. |
The Plaza Centre 2 player cap 3 seconds. |
The Street Centre 1 player cap 1 second. |
Map Author - Davide "Chow_Yun_Fat" Pernigo
Author text in game:
January, 1944, Italy
The Allies have prepared a simple, fast beach assault to capture the city of Anzio. Little did they know that the Germans were already there, waiting.
Allied Objectives:
- Capture the 5 flag points
Axis Objectives:
- Capture the 5 flag points
The game starts with both Allies (US) and Axis controlling the flags just outside their spawns. The Streets and Gun positions, US flags 1 and 2 and German's, flags 4 and 5.
The Market flag in the centre is quite exposed and both sides have high points to pick you off. The centre flag is only 5 seconds but it feels like a full minute when capping. Its the same for the two MG gun positions, especially the allied end as there is daring sprint required to reach it.
Hint: Use the many back routes and confuse the enemy but like Anzio... the centre and longer timed flags in the mg spots are key to a win. So show some courage, take some risks and grow a pair of eyes on your helmet and something else in your pants.
Best Sturmbot waypoints (INsane's 2019 opinion): Best are from Martee in Oct 2019. This set had a review in Oct 2019 and fixed a lot of bugs, the result was it knocked out Godcha's set due to better routes and more balance, it makes the map more interesting and that is what Avalanche deserves, after all it is one of the great maps of dod.
The Golden Pathways pack was second but not as good as the many routes Martee's set gives the Sturmbots. Created by Godcha in July 2003, they certainly beat the official version 1.6 Sturmbot team set that has way too many issues that kill the chances for the Axis side. The waypoints in the axis spawn area stall the axis getting in the centre and its game over very quickly. Avoid the official version 1.6 Sturmbot team set, they are really bad.
Waypoint Hint: Server size is best around 8-16 players, maps like this have issues if too many bots are trying to navigate the tough routes through the buildings.
 |
 |
| dod_avalanche - The flag overview | dod_avalanche - Routes on the minimap |
 |
 |
 |
 |
 |
|
1. The Allied street Stand around the flag area 1 second. |
2. Allied gun position Stand around the Flag 3 seconds. |
3. The market. Mid' Stand around the flag 5 seconds. |
4. Axis gun position Stand around the Flag 3 seconds. |
5. The Axis street Stand around the Flag 1 second. |
Map Author - Iikka "Fingers" Keranen Doom Wiki page Counter-Strike Wiki Find him at VALVe "Game Design"
Author text in game:
September, 1943, Italy
A couple of days after establishing a beachhead at Salerno, the American advance towards the hills was stopped by a vicious German counterattack on September 13. Intense street fighting ensued, with some towns changing hands several times a day.
Allied Objectives:
- Capture the 5 flag points
Axis Objectives:
- Capture the 5 flag points
This map is close to symmetrical with both teams starting the game with 2 capture areas they already own relatively close to their spawns. TNT and Piat's (British Bazooka) are on the ground in the spawn at map start.
The explosives are not required to reach each capture area but if you do not blast the walls in various places (hard to spot, look for large star shaped cracks at eye level ) you do not gain access to the side routes.
Hint: In the "dod_caen - The flag overview" image below you can see some red icons, go to that area and look for a star crack in the wall, if you have a bazooka, stand well back and aim at that point. If you picked up a satchel charge in spawn (via running over it) you stand near the wall and it will automatically set the charge for 5 seconds... run away or it will damage you.
Hint: There is a also a wall near the allied bunker with a window that axis snipers like to nest in. If you have a bazooka (Piat) aim near that window and blow it and the sniper away. There is a lot going on in this map, it can be fun or hell depending on how well you know it. It has a love - hate reputation because of bugs, the explosions, the places like the electrical shock in the allied side route and the fire in the axis side route.
Files in the dod folder: Ensure - mp_spawnbazookas 1 - is set in your dod/dod_caen.cfg file or the bazookas will not spawn. I do have a fix for this bug if you are interested. Another item, even after the file fix. You may start a game on dod _anzio, then change to dod_caen, the bazookas are missing again, just load dod_caen again and they will come back.
If you know it well and have your team open up the map quickly you will dominate, those that don't learn this map have a bad time. It suffers some current bugs where the bazooka's don't spawn, I tried to explain that here.
Best Sturmbot waypoints (INsane's 2019 opinion): Martee has remade this September 2019. I tried 4 versions, all were broken because of the changes to the map structure in the last steam versions. If you like to cap out maps then use this set on a 12 player server, up to around 16. If frags are what you like best and the occasional hard to get cap out then go for a 18 - 32 player server. It's so nice to have a decent set of dod_caen waypoints at last for the Steam version of dod.
Waypoint Hint: This set is configured for Bazooka's, the bots will break most of the walls, the walls between the allied 2nd ("British Bunker" in the "dod_caen The Flag Overview" image below) and 3rd flag are difficult so help the bots out with those two.
On the axis side the wall closest to the 3rd Axis flag "Axis Plaza" is also a problem for the bots so pack a satchel charge and walk up to it if that bothers you. Do try the map on different player numbers, as I said the most satisfying for me was a 12 player server and around 18+ or so players on a server the cap outs start to get very hard on the last two flags. This map is all about blowing those access walls, once they open so do your options on getting behind the enemy players. The bots on this waypoint set have some surprising camp spots installed by Martee, just to keep you on your toes.
 |
 |
| dod_caen - The flag overview | dod_caen - Routes on the minimap |
 |
 |
 |
|
1. Allied Street Run through the flag - 1 second |
2. Allied Bunker Run through the flag - 1 second |
3. Allied Plaza Run through the flag - 1 second |
 |
 |
 |
|
4. Axis Plaza Run through the flag - 1 second |
5. Axis Bunker Run through the flag - 1 second |
5. Axis Street Run through the flag - 1 second |
Map Author - early versions: "Helven" made the early versions of this, version Alpha 6.7 (28/01/2000) in the readme says it was introduced then.
The Steam dod 1.3 version Author:
Tim "Waldo" Holt Read this too... About the Author He is one great mapper... Mapping Article
by Tim "Waldo" Holt. He makes maps I love to play. Man has talent.
Author text in game:
July, 1944, France
The battle of Caen was planned even before D-day, and was not over until mid July. What took place in the streets was some of the fiercest combat of the Western Front.
British Objectives:
- Capture the 5 flag points
Axis Objectives:
- Capture the 5 flag points
This beach map is a challenge for the allied (US) team, Axis are defending a central Radio Tent, two 88 guns on the left and right and Coastal Gun to the left and rear of their spawn.
But Axis cannot retake the areas as "capping" the area involves detonation of equipment, once it is destroyed it cannot be retaken.
Axis win the dod_charlie by defending and holding off the Allied push into their defence zone above the beach. Axis have many advantages and early on it looks too easy. Great snipping spots, MG nests, you can use mortars (press the use Key E near on). Remember when the Allies do get into your defensive zone they can now come behind you and even overwhelm your spawn exits.
Allied soldiers must destroy all targets with Satchel Charges found on the beach. Before going into the Axis defence areas the team must get past physical barriers. You will start at the beach and at round start find a Satchel Charge and head for the two "Shingle" zones marked with red smoke. To pick up a Satchel Charge just run over one and you will see it in your HUD (Halfway up on the left side).
Stand, crouch or lie near the smoke and in around 4 seconds you will see the charge disappear from your HUD. When that happens it will blow in 5 seconds so run away immediately about 10-15 steps as it will blow a hole in the bank. Sounds easy? Well by now Axis have set up MG's, snipers and getting up the beach is very difficult. Getting the two "Shingle" zones opened is a priority.
Once the "Shingle" zones are open the left side is open, grab another Satchel Charge and you can advance to the left axis 88 gun, stand near it, in around 6 seconds the Satchel Charge will be removed from your HUD and again... step away as it will blow in 5 seconds. There isn't much more on the left side except a mortar nest, go there are with your main gun shoot it and you can destroy it. No points for doing that but Axis cannot use it after that.
There are four of those mortars, one on the left, one near the Coastal Gun and two on the right. I always destroy them... it helps your teammates still on the beach.
Speaking of the right side, after the right "Shingle" zone is open you have a sand bag wall and a concrete wall to blow up, then you can access the Radio Tent and the right 88 gun then finally the coastal defense gun.... that is before the map ends.
Hint: This is no push over map for the US team, that's a poor hint but if you are a camper by heart and are just in it for the kills... join Axis. But, if you are up against a good Allied side my advice is keep looking behind you as there is nothing better than knifing a camper, waiting for them to return to the same camping spot and doing it again. Once Allies are behind you, you're not safe anywhere.
Best Sturmbot waypoints (INsane's 2019 opinion): The best is from Martee 2019. The Official Sturmbot version 1.6 is OK it was close in my tests. If I had to choose one I like Martee's set for dod_charlie.
Waypoint Hint: The official 1.6 waypoints allies capped out all in my tests, Martee's waypoints were good but there seems to be an issue on the coastal gun capture, in saying that his are better if you take the Coastal gun yourself.
 |
 |
| dod_charlie - The flag overview | dod_charlie - Routes on the minimap |
 |
 |
 |
 |
|
88 #1 (Left) Stand close to it - 6 seconds 5 second timer |
88 #2 (Right) Stand close to it - 6 seconds 5 second timer |
Radio Tent (Centre) Stand close to it - 6 seconds 5 second timer |
Coastal Gun (Centre rear) Stand close to it - 6 seconds 5 second timer |
 |
 |
 |
 |
|
Typical Mortar Shoot 3 rounds at them to destory To fire (axis) "E" key (use) |
"Shingle" zones Be near them for 3 seconds 5 second timer |
Right side walls Be near them for 3 seconds 5 second timer |
Typical 5 second warning If you are this close you die. Run. |
Map Author: Joel "c0w" Weech Linked In profile
Author text in game:
June 6th, 1944, Normandy
D-Day - Today is the turning point of the war! Failure is not an option -- move up the beach, or perish!
Allied Objectives:
- Destroy the shingle to move up the beach
- Destroy the two 88 'flak' guns
- Destroy the Axis radio tower
- Destroy the artillery bunker
Axis Objectives:
- Defend the beach
- Once the beach defences are breached, fall back and defend
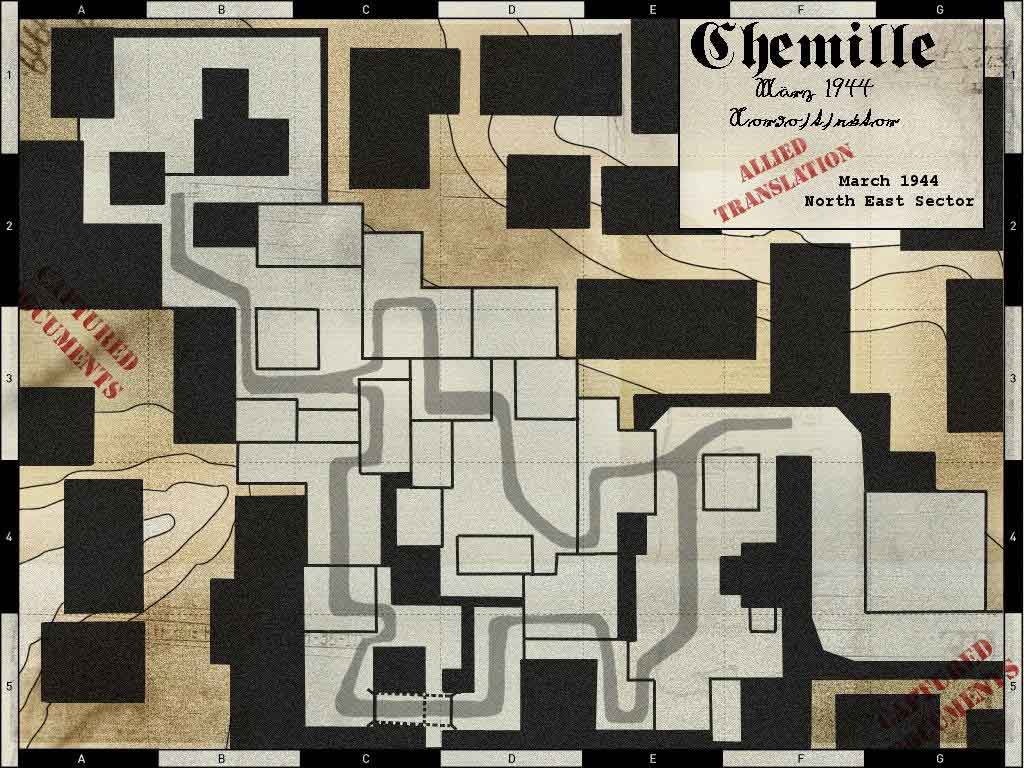
There are four 0 second flags on dod_chemille. Both spawns have spawning bazookas on the ground (Press Key "G" to pick up) and the bazooka class is enabled, these are for opening side routes (see the red icon in "The flag overview" image below).
"The Destroyed House" flag is closest to Allied (US) spawn. "The Church" flag is closer to the Axis spawn.
There is a central flag "The Destroyed Factory" and "The Underpass" flag is to the centre and the furthest away from both spawns... a nasty place to cap if MG's are guarding camping there.
Files in the dod folder: Ensure - mp_spawnbazookas 1 - is set in your dod/dod_chemille.cfg file or the bazookas will not spawn. I do have a fix for this bug if you are interested.
Like dod_cean if you know it well and have your team open up the map quickly you will dominate, those that don't learn this map have a bad time. It suffers some current bugs where the bazooka's don't spawn, I tried to explain that here.
Hint: It's a good run and gun map, tight and fast. Pick a class to suit, tommy guns and MP 40's do well. Do blow up the side route doors early on, it gives the campers more than one route to worry about.
Files: Ensure - mp_spawnbazookas 1 - is set in your dod/dod_chemille.cfg file or the bazookas will not spawn.
Best Sturmbot waypoints (INsane's 2019 opinion): Martee It was the only set reviewed where bots picked up bazookas and blew out the side routes. Download here.
Waypoint Hint: Help the bots blow the side routes.
 |
 |
| dod_chemille - The flag overview | dod_chemille - Routes on the minimap |
 |
 |
 |
 |
|
The Destroyed House 1 player cap - 0 seconds. |
The Destroyed Factory 1 player cap - 0 seconds. |
The Underpass 1 player cap - 0 seconds. |
The Church 1 player cap - 0 seconds. |
 |
 |
 |
 |
| Side path nearest to Allies | Side path nearest to Axis | Bazookas | Panzerschreck |
Map Author: Chris "Narby" Auty
Author text in game:
Allied Objectives:
- Capture the 4 flag points
Axis Objectives:
- Capture the 4 flag points
This 5 flag game starts with the two "closest to spawn" flags (those 4 flags are 1 second walk through captures) held by each side and a central 2 person - 6 second capture area in a neutral state.
So the obvious objective is to capture "The Main Street" in the middle by standing behind or around the tank, hold on to the middle and force the other team back to their spawn. Sounds simple, it isn't. This game can bog down if your team hides in buildings and defends.
There are good side routes to use so use them. The right side (from allies spawn) has an intersection to centre capture area so if the axis are hammering the second allied flag then... get behind them. Same for Axis, the side routes are there for a reason.
Of course that all works well in theory but if the other team are also camping the side route then... you are doomed.
Hint: It's a great map for rifles along the main route also MG's, avoid the various long main street area and own the side routes with a spamming tommy gun. It is one of the few maps I would consider having a good sniper and MG on your team as there are plenty of camping spots up the middle and your team need to counter them with the same especially if the other side have you back to your last flag.
Best Sturmbot waypoints (INsane's 2019 opinion): Martee has remade this in Sept-Oct 2019 download here. Martee's set is one of those rare ones where the bots in testing cap out without any help. Tested best on a 16 player server but fun at any setting I found. It takes the very broken other waypoints in the official packs off the list and you should avoid all others.
The map structure changed is why the official and other sets were broken, so for the Steam version map they are broken, earlier map/dod versions they are not.
Avoid all others like the official 1.6 waypoints...they have incomplete paths.
Waypoint Hint: Just enjoy yourself and let the bots take all the risks, this is a well crafted set of waypoints. As always fine tune your server size, I found cap outs common if you set around 12-16 players.
 |
 |
| dod_donner - The flag overview | dod_donner - Routes on the minimap |
 |
 |
 |
 |
 |
|
The Allied Headquarters 1 player cap - 1 Second |
The Allied Street 1 player cap - 1 Second |
The Main Street (Mid') 2 player cap - 6 Seconds |
The Axis Street 1 player cap - 1 Second |
The Axis Headquarters 1 player cap - 1 Second |
Map Author: Svante "xerent" Ekholm Links: His maps are here. Not a lot found but there is his "retirement" notice July 17th, 2003 here. The same link on the internet achive shows he had a page hosted by dod HQ, here is the last entry.
Author text in game:
June, 1944, Normandy
The Allies struggle through the hedgerow country towards the key town of Sainte Lo - the intersection for roads to key cities such as Caen and Carentan.
Allied Objectives:
- Capture the 5 flag points
Axis Objectives:
- Capture the 5 flag points
This is a detonation object map, both sides are trying to blow up objects near the opposing sides spawn, it’s a difficult task. There are many ways to those items but it is fair to say this map can bog down into camping each other’s spawn. It’s unavoidable as to get a chance of winning you must suppress the area just in front of spawn where the targets to blow up are situated.
Allies players need to pick up satchel charges at their spawn and blow up both Nebelwerfers in the Axis spawn area. To blow them up you need to stand near them at the side or back (not the front where the sandbags are) for around 3 seconds. Keep away as the countdown of 5 is only 3 seconds.
One satchel charge will destroy a Nebelwerfer (multi barrelled rockets) but…there are two of them before you can win. Allies have one Mortar on the top of the left spawn building. Pressing “E” Key (Use) will send Mortars to the Axis spawn area.
Axis players need to pick up the explosives in Spawn and blow the bridge. To do that you need to walk on the bridge and get to half way. The explosive will drop immediately and a countdown of 5 (around 3 seconds) will begin, get off the bridge! The bridge needs 2 explosive charges to win the game. It’s hard because the bridge is right outside allied spawn.
Axis has 2 Nebelwerfers that you can fire by pressing “E” Key (Use) and they will land on the allied side of the map.
Best Sturmbot waypoints (INsane's 2019 opinion): The best are from Martee Oct 2019, download here. This set does what the other two tested did not. In testing on a 16 player server the Allied team caps out by themselves. The Axis did not. This does not make them unbalanced as Martee has good support for what the nap needs, to cap out the two Nebelwerfe's you need to pressure the Axis spawn area. He provides good support for Axis, they get to the bridge and even set of a charge but less frequent than the Allied team on the Nebelwerfe's. The Axis fire the Nebelwerfe's and provide a enough disruption for "human" players to camp near the bridge, wait and rush on to it. Its a tactic in waypointing put to good use, provide support enough for you (human meatbag) to cap out.
The official Sturmbot 1.7 waypoints worked OK as did Godcha’s set from his Golden Pathways Sturmbot Pack Ver 1. Godcha’s set seemed to get the bots in places that the others couldn’t. Both sets tested did not end in capping the map. Martee's set fixes all those issues.
Waypoint Hint: Apart from fine tuning your server numbers, I found all you have to do as an Allied team member is just do as they do, grab a charge and pressure the spawn, get to the Nebelwerfe's and set off the change. As Axis its a matter of leaving spawn with TNT and let the other bots deal with the camping allied team. Use the extreme left or right side routes and wait until no allied team members are around the bridge, just make a dash for the middle of the bridge, stand for a second and run off it. It requires 2 charges and unlike the allied targets they instantly set without a countdown.
 |
 |
| dod_escape - The flag overview | dod_escape - Routes on the minimap |
 |
 |
 |
 |
| Allied Spawn Charges | Nebelwerfer #1 | Nebelwerfer #2 | Allied Mortar Spawn |
 |
 |
 |
 |
| Axis Spawn Explosives | Bomb Allied Bridge - Win | Bomb Allied Bridge Charge 1 | Axis Fire Nebelwerfer |
Map Author: Arjan "IR" Bak His Linked In page is here.
Author text in game:
Holland, 1944
Operation market garden launched a few hours ago, and the allies are moving into position. Paratroopers of the 101st division secured a bridge and a key supply route along the river Maas. Unfortunatly an axis paratrooper unit is stationed in the area, and are shelling the allies with nebelwerfers. It wont be long before the axis launch an attack to destroy the bridge.
Allied Objectives:
- Hold the bridge and defend it by any means
- Destroy the nebelwerfers firing at your position
Axis Objectives:
- Destroy the bridge
This is a map with five objectives to capture to win. The game starts with each side already owning it’s “nearest to the spawn” first and second capture areas and there is one neutral two person capture in the middle.
This map forces you to use most of the side routs as both second flags are not on the main route.
dod_falaise must have the longest names in Day of Defeat history for the capture areas, takes longer to say them than to cap them.
Allies first is a tank called “Master Sergeant Cranbarry's M4A4 Sherman Tank”. A single player can cap the tank in around 3 seconds.
Allied second capture zone is “Ramrod 6's M38 A1 Jeep”. A 2 person 5 second capture.
Middle Capture is called... "Hauptmann Shane's Tiger I Tank from the sPzAbt.101”. A 2 player 5 second capture.
Axis first is called “Oberleutnant Vulpnine's Kubelwagen Type 82 Pkw.K1”. A single player can cap the tank in around 3 seconds.
Axis second capture zone is a two person capture “Leutnant Headrancher's Flak 36 88mm multipurpose cannon”. A 2 person 5 second capture.
Hint: Hard map to cap out and requires teamwork, but once you are down to the last flag it’s over very quick.
Best Sturmbot waypoints (INsane's 2019 opinion): The Best is from Martee September 2019 download here. This set was well balanced with either side splitting up well and attacking all capture zones and not just using the main route and slugging it out on a middle capture. The bots use a lot of the buildings and side routes so it adds unpredictability to the game. You never know where the bots are going to pop up. They will cap out on their own a mark of a good set. The only others were by Piper (2004) they work fine, I found a possible slight bias to allies and cap outs were rare, overall a good set but Martee's set are far better balanced.
Waypoint Hint: This set doesn't need any special attention, just keep an eye on the object icons as this map is full of 2 player captures that are the key to capping out the map. Tread carefully as the bots do run through the buildings and do have some good camping spots. Consider a 16 player limit for this one. Bind a key to the "I need back up" voice command like… bind "i" "voice_backup" it comes in handy on maps with multiple player capture zones.
 |
 |
| dod_falaise - The flag overview | dod_falaise - Routes on the minimap |
 |
 |
 |
 |
 |
| Allies 1st Tank 1 Player cap 3 Seconds. |
Allied 2nd - Jeep 2 Player cap 5 Seconds. |
Middle – Tank 2 Player cap 5 Seconds |
Axis 2nd – 88 Flak 2 Player cap 5 Seconds. |
Axis 1st Type 82 1 Player cap 3 Seconds. |
Map Author: Wes "FuzzDad" Shull Page at VALVe
Author text in game:
June, 1944, France
Allied paratroopers are trying to capture a small French Village near the Falaise Gap in an attempt to cutoff the remainder of the German forces attempting to escape the Cotentin Peninsula. German Fallschirmjäger have been sent to the rear to hold off the allies so the remainder of the German Army can escape to the east. It's the beginning of what will soon be called "The Miracle in the West"
Allied Objectives:
- Capture the 5 flag points
Axis Objectives:
- Capture the 5 flag points
This is a map with five flags to capture. The game starts with a neutral middle flag and each team owns their first and second flag.
Allied 1st – “Allied Base”. Allied 2nd – “The Trail”.
Middle – “Flashville Street”.
Axis 2nd – “The Field”. Axis 1st – “Axis Base”.
The flags are all instant walk through to capture so the map can be quite quick to cap out. There are two side routes and the layout is quite even for both sides as far as access paths to the flags goes.
Hint: It’s a fast paced map with medium and long distance areas, any gun is good but you may prefer a rifle on this map and two grenades as they are handy for suppressing MG’s around corners. A support class is also OK but for Allied the Bren may take time to get used to.
Best Sturmbot waypoints (INsane's 2019 opinion): The best set is from Martee Sept 2019. In all the waypoints tested (including Martee's early 2019 set) there were many issues around building entry and bots were getting stuck. Martee has reworked his set and it now beats Godcha's set in balance, navigation and bots are willing (because of extra care on pathway placement) to take the last flags. Tested and enjoyable on a player server of 8-16 I found 12 players were the sweet spot for me. The map itself does not have enough routes around the centre flag to push it further than 16 players in total, unless you do like a crowded server for "target practice", in that case 32 players are for you.
Godcha "Golden Pathways Sturmbot Pack Vol.1.1" - these were Axis dominant in my tests but they clear obstacles (there are doors you need to shoot and break) I didn’t see them get stuck on items. In three tests Allies never got past middle and Axis capped out once.
Official file is from Sturmbot ver 1.6 – the bots get stuck in the ruins just before the middle. Avoid.
Waypoint Hint: Let the bots do all the work up the main route. Take the side routes and be ready to make a dash for the last flag. All flags are quick run through flags so the pace is naturally fast.
 |
 |
| dod_flash - The flag overview | dod_flash - Routes on the minimap |
 |
 |
 |
 |
 |
| Allied Base 1 Player cap. 1 Second. |
The Trail 1 Player cap 1 Second. |
Flashville Street 1 Player cap 1 Second. |
The Field 1 Player cap 1 Second. |
Axis Base 1 Player cap 1 Second. |
Map Author: Svante "xerent" Ekholm Links: His maps are here. Not a lot found but there is his "retirement" notice July 17th, 2003 here. The same link on the internet achive shows he had a page hosted by dod HQ, here is the last entry.
Author text in game:
October, 1944, German Countryside
British troops have advanced into what appears to be a small, quiet village. A few platoons are ordered forward to check out the situation.
British Objectives:
- Capture the 5 flag points
Axis Objectives:
- Capture the 5 flag points
This map has six capture points, all take only one player to capture and are made up of two central Me262 planes to stand near and capture (5 seconds). The other four are two per side run through flags (1 second) each team has one near their spawn (loading dock East for Allies and West for Axis) and another for each team that are the entrance to the runway area in the maps centre. Each spawn has protection (gas attack) if an opposing side player gets too close and there is a warning on the screen in case you have gone past the dock area.
The entrance to the taxiway/runway situated in the centre has a fence just after the eastern or western entrance flags, the fence can be destroyed and needs be shot at few times, blown up via 3-5 bazooka rounds or two grenades at its base. It can be jumped over easily on one end.
The planes can be destroyed too, but can be retaken again. There are decent side routes and it will take a while to work out the map.
Hint: Although routes look complex at the start you do work it out using the mini map. Get to know the different ways around the map so you can avoid MG nests and snipers.
Best Sturmbot waypoints (INsane's 2019 opinion): Martee's set from Oct 2019 is best, Download here. Martee had to put a lot of work into these, they ended up great. The balance is good, the bots are using almost all of the routes available, certainly to a level that is way above others. It works great on any server player number and is one of the few you can have 32 players and have fun.
The only other set that came second was a set that needed a lot of editing because the map structure was altered in the last steam version. At the same time waypointers seemed to drop off the planet. This is the same issue as dod_caen, dod_donner, dod_glider and dod_saints, the mapper changed the final map and many waypoints were displaced… actually under-ground.
The Official 1.7 waypoints are quite bad. They threw up errors on missing paths. Avoid.
Waypoint Hint: These are now one of those well made waypoints that suit any server size and you still have a great time, just play and enjoy the map like Wes "FuzzDad" Shull intended.
 |
 |
| dod_flugplatz - The flag overview | dod_flugplatz - Routes on the minimap |
 |
 |
 |
| The eastern loading dock 1 Player cap 1 Second. |
The eastern taxiway entrance 1 Player cap 1 Second. |
Me262 on the runway 1 Player cap 5 Seconds. |
 |
 |
 |
| Me262 in the hanger 1 Player cap 5 Seconds. |
The western taxiway entrance 1 Player cap 1 Second. |
The western loading dock 1 Player cap 1 Second. |
Map Author: Wes "FuzzDad" Shull Page at VALVe
Author text in game:
March 1945, Germany
American troops are advancing into Germany and have assaulted
an airfield where ME-262 jet pilots are being trained. Crack
German paratroopers are guarding the base and they will do
anything to drive the Allies out.
Allied Objectives:
- Capture the 6 flag points
Axis Objectives:
- Capture the 6 flag points
Flag Objectives:
- Flag near Allied Spawn (touch)
- Flag on road near headquarters building (touch)
- Me262 on the taxi-way (cap)
- Me262 in the hanger (cap)
- Flag on road near supply shack (touch)
- Flag near Axis Spawn (touch)
The map has 4 areas to capture. The game starts with each team owning the two nearest to their spawns. There are underground routes in place of side routes in this map that can be handy from the spawn to your current team’s second flag.
Mostly the action revolves around who controls the centre, then force the opponents back to their last flag, place pressure on their spawn exits and cap out the map. There are mortars dotted around the map and they target the opposing side if they are halfway to the area you are defending, so only use if they are close as you may end up killing your teammates going for the last flag.
You may notice the Mortar model changes direction if you take one of the enemy central capture areas. The Mortar's are actually physically turned around now and fire towards the enemy so use them! If you are on a higher player number server they can snag a few kills but really they are not as effective as a full coordinated assault.
Files in the dod folder: Ensure - mp_spawnbazookas 1 - is set in your dod/dod_forest.cfg file or the bazookas will not spawn. I do have a fix for this bug if you are interested.
It suffers some current bugs where the bazooka's don't spawn, I tried to explain that here.
Hint: Tough map to cap out. Make sure you are in the trench when near the capture zone flag. Best gun is sniper, rifle and MG’s rule this map. You need to suppress the opposing side hard to win last capture. Bazooka’s are in the spawn area, Tunnels, Towers. The towers and bunkers can be destroyed using Bazooka’s… its where snipers and MG’s like to “nest” so blow them up... preferably with a camper in it.
Best Sturmbot waypoints (INsane's 2019 opinion): Martee's set from Oct 2019 grab them here. Good support bots was the intent here when he made these, the allied team did best in the tests I did but in saying that, I did see an Axis bot take the allied first and hold it for a few minutes, no other waypoint tested could do that, very sneaky. After looking at Martee's waypoints in depth you can tell he knows dod maps... he would be not push over in a game.
Godcha (Golden Pathways) where also OK, they had some small bugs and less routes than Martee's set with the bots slugging it out in the central forest area and... never getting beyond that.
Others: Official Sturmbot ver 1.6 – Bad, allied bots stuck on underground ladder and even after that advantage axis still would not cap. Avoid.
Waypoint Hint: Help the bots suppress the choke points between the first and second capture zones, the last capture on both sides is hard. Grab a MG and work on suppressing… yes camping is good on this map. In saying that I got to the last flag as a rifle and pressed "I need back up" voice command that made the bots move into the last capture zone. Its a hard map to cap, it's also very cool to actually get it done.
 |
 |
| dod_forest - The flag overview | dod_forest - Routes on the minimap |
 |
 |
 |
 |
|
The Allies hill trench 2 Player cap 5 Seconds. |
The Allies central forest trench 2 Player cap 5 Seconds. |
The Axis central forest trench 2 Player cap 5 Seconds. |
The Axis bridge trench 2 Player cap 5 Seconds. |
Map Author: Brian "Arcturus" Schurko
Author text in game:
DOD_FOREST by Brian "Arcturus" Schurko (
August, 1944, Western Front
Two opposing forces have dug-in within the cover of a French forest. Walk carefully and capture the trenches!
Allied Objectives: Capture the 4 trenches.
Axis Objectives: Capture the 4 trenches.
Utilize enemy mortars where possible, and use Panzerschrek/Bazooka weapons to take out fortifications.
This map has five Axis controlled objectives. Like dod_charlie the owner at the start is Axis and the objects to be captured require destruction and cannot be re-captured.
Allies win if they destroy the objectives in the map time. Axis win if they do not.
Lots of routes to pick from, in the allied spawn you go left or right but once you have blown access holes (the sewer wall on the left allied route to access the radio room - the bunker front wall near the radar on the right route) at either end you can have access to the objectives approaching from the rear. You can also blow the radio room from below instead of risking entering the room full of camping axis players, blow them all up... see the images below for that spot.
Hint: Bazookas are helpful on this map for Allies, you can use them on objects like The "Freya" Radar instead of satchel charges. Don’t forget… never leave allied spawn without grabbing a satchel charge. Axis strategy is just a matter of holding on and sometimes that means going further into the map to suppress the routes to the allied targets.
Best Sturmbot waypoints (INsane's 2019 opinion): Martee from Oct 2019 grab them here. His set is more balanced and they replace my set that was overly bias to the allied side. Martee adjusted his so Axis attack the allied routes better than my 2012 built set.
The map origins moved in an update so all others (except mine) that have waypoints are not placed in the paths of this new map position. The result is, you have no waypoints even though the start up screen says so. Avoid all others from pre 2012 they are only good for the version of dod_glider in older dod steam versions.
Waypoint Hint: If you are on Allies, go Bazooka class and look at the images below on how to take the right route and cap using a Bazooka. It is a lot of fun. If on Axis your task is to suppress the routes to the objective zones. Server size is open to your taste.
 |
 |
| dod_glider - The flag overview | dod_glider - Routes on the minimap |
 |
 |
 |
 |
|
The '88' flak cannon 2 X charges or bazooka |
"Freya" Radar set 2 X charges or bazooka either side of array. |
Radio room inside castle 2 X charges required Two different spots. |
German supply house One change to enter. Charges inside to pick up |
 |
 |
 |
 |
|
The German bunker 1 X charge or bazooka Wait inside 5 seconds |
Sewer wall 1 X charge or bazooka Up ladder shoot the door |
Blow underside radio room 2X Bazooka to capture |
Leave the dang cow!!!! It didn't hurt you... why kill it? |
Map Author: Wes "FuzzDad" Shull Page at VALVe
Author text in game:
DOD_GLIDER by Wesley "Fuzzdad" Shull (
June, 1944, Normandy
Allied paratroopers have dropped behind the D-Day beaches to
disrupt enemy communication and reinforcement to the front.
Allied Objectives:
- Destroy the '88' flak cannon
- Destroy the "Freya" Radar set
- Destroy the Radio room inside the castle
- Capture the German forward supply house
- Capture the German bunker
Axis Objectives:
- Clear the area of Allied paratroopers
This map has 3 objectives. These initially look like simple tasks but on a full server with well defended spawns it can be challenging.
The Allied team (UK) has to get to the Horsa glider near the Axis spawn and pick up a document (walk over them) located near the tail of the glider. The player with the "secret operational plans" documents should be helped by the team to get back to the Allied spawn "Command Centre" building, inside on the top floor there is a radio, if you have the documents just close to the radio for 2 seconds and you cap out the map. If you drop the map (by getting killed) the will eventually return back to the Horsa glider.
The Axis team has to blow up two tanks outside the Allied spawn. You do not have satchel charges, a Bazooka is required, only one Bazooka round per tank is required and you cap out the map. The Bazooka class is selectable on this map and there are also Bazooka's inside both spawn areas.
Hint: Teamwork is critical for Allies if a Allied player has the documents, that player is like a walking flag to defend and get back to spawn. Also the objectives, two tanks outside Allied spawn and the documents near the glider need defending so expecting the spawn areas on both sides to be clear of guards campers is wishful thinking. Bazookas are helpful on this map for Axis, consider the route to the right of Axis spawn. Spawn as a Rifleman, grab a bazooka and you will have 2 X grenades, a pistol and a Panzerschreck, take some friends and attack the tanks using the right side. Like the Allied team, teamwork is the key.
Files in the dod folder: Ensure - mp_spawnbazookas 1 - is set in your dod/dod_jagd.cfg file or the bazookas will not spawn. I do have a fix for this bug if you are interested.
It suffers some current bugs where the bazooka's don't spawn, I tried to explain that here.
Best Sturmbot waypoints (INsane's 2019 opinion): The best set is from Martee October 2019. Both Martee and myself drove ourselves crazy on the issue of bazooka maps and why they didn't work with Sturmbot's. Working together we have sorted it out.
dod_jagd needed a lot of investigation on why bots did not use the bazooka correctly. It needs a particular design around the objective to work or the bots do some strange things. None of this fix is in the official waypointing guides. It will be soon on this site.
If you are working on a waypoint set look at the image below for a guide, do it any other way like the official guides mention and it will not work.
Sturmmann74 had the best second set from his "Sturmmann74 early June 2003" pack. Using this set the bots destroyed one tank as Axis and at least helped to cap out the map, the allied bots got the documents but... as bots are, instead of going back to Allied spawn and capping out, on all occasions the bot thought it was better to stay around Axis spawn and fight other bots. No complete cap outs were recoded by the bots. Avoid.
I tried the Sturmbot Official 1.7 waypoints and while they were better in some areas than Sturmmann74's set, the bots in the Official set get stuck a lot in the Allied spawn. Also it was affected by the bazzoka issue. Quite broken. Avoid.
Waypoint Hint: Don't rely on the Allied bots to cap out. If you are on the Allied team consider going for the documents yourself, grab the docs and run back to spawn. Axis support is quite good, they attack the right and left side route very well and even camp the Allied spawn hard. You will find this set of waypoints is a slight bias to Axis, but if you do not alter your main dod files as mentioned above it will have a larger bias to the allied team.
 |
 |
| dod_jagd - The flag overview | dod_jagd - Routes on the minimap |
 |
 |
 |
|
The Documents pick up area near Axis spawn. |
The Radio to take the docs to and cap the map. |
The Two Tanks outside Allied spawn. |
 |
||
| The fix found for a correct waypoint circuit, this fix also helped all maps that need bazooka's to cap the map. | ||
Map Author: Arjan "IR" Bak His Linked In page is here.
Author text in game:
June, 1944, Near Caen
The British Army is advancing towards Caen, but is being held up in the town of Viller-bocage by a German Panzer division. To make matters worse, a Horsa glider carrying plans for the attack on Caen has crashed in enemy territory.
British Objectives:
- Recover and return the plans from the downed glider
- Defend the Cromwell tanks
Axis Objectives:
- Stop the British from recovering the battle plans
- Destroy both British Cromwell tanks
This map has five flag capture points, the game starts with each side owning the flag directly outside their spawns. All others are neutral.
Each of the nearest to spawn flags are a 1 person - 2 second "walk through the flag" capture points, the next flag closer to the allied and axis spawns is a 1 person - 1 second flag, the middle flag at the bridge takes 2 players - 5 seconds to capture. There are Bazooka's in the spawns and they are a selectable class in dod_kalt, they can be used to blow up walls around the map to open up access.
The map is well known for its underground sewer system, it adds another route (via manhole exits) to the 1st and 2nd flags near each spawn and there is one manhole opening in the middle, it's located at the end of a water wheel opening inside a central building, a mill house.
Hint: Use the tunnels if you get bogged down on the main route, it is possible to get behind an enemy and attack. Like all maps that have a 5 flag combination with a multiple payer middle capture point, taking and holding the middle is the key. Any kind of gun is OK on this map, if you are in the tunnels a lot... machine guns are best.
Files in the dod folder: Ensure - mp_spawnbazookas 1 - is set in your dod/dod_kalt.cfg file or the bazookas will not spawn. I do have a fix for this bug if you are interested.
It suffers some current bugs where the bazooka's don't spawn, I tried to explain that here. Although kalt does not require bazooka's to cap the map, the fix is there if you need it.
Best Sturmbot waypoints (INsane's 2019 opinion): Martee's set from 2019, download here. I altered a set from Godcha and right after that Martee produced his set. His set goes much further than my adjustments did.
All others found were broken, about 20% had errors on doors, tunnels, bazooka waypoints. The cause was the map changed and this altered the paths.
The Official waypoints are from Sturmbot 1.6 no version 1.7 were made. They have issues around doors and especially the tunnel areas. The map got updated in one of the game revisions and some pipes were installed, that may be why all the waypoints I tested have this issue. Godcha (Golden Pathways) also had the same errors.
Waypoint Hint: The bots use the tunnels and all side routes well so... look out for camping bots on every turn. Concentrate on the last two flags and use the tunnels. Warning... Martee's set also use the tunnels to great advantage, you are not alone down there so... be careful on every turn. Best server size is 8 -16 players.
 |
 |
| dod_kalt - The flag overview | dod_kalt - Routes on the minimap |
 |
 |
 |
 |
 |
|
Allied Bunker 1 Player 2 Seconds |
Allied street 1 Player 1 Second |
Bridge (middle) 2 Players 5 Seconds |
Axis Street 1 Player 1 Second |
Axis Bunker 1 Player 2 Seconds |
Map Author: Tim "Waldo" Holt Read this too... About the Author another linkedin contact page. Also Stackoverflow page. He is one great mapper... Mapping Article
by Tim "Waldo" Holt. He makes maps I love to play. Man has talent.
Author text in game:
December, 1944, Western Front
The half-frozen town of Kalt became the setting for some of the most brutal fighting of the war - firefights raging in the streets, houses, and sewers.
Allied Objectives:
- Capture the 5 flag points
Axis Objectives:
- Capture the 5 flag points
This map has paratroop teams Allied (US) and Axis. The map starts with the Allied team owning two objectives, "The American Fuel Dump" to the left of allied spawn and "The American Fuel Truck" to the right of allied spawn.
Both require 2 Axis players to stand close to the objective for a long 8 seconds. There is a timer of 10 minutes, if Axis fail to take the two objectives within 10 minutes the allied team win.
Once an objective is taken by Axis it cannot be retaken by the Allies.
Hint: The fuel dump is particularly hard capture as it is very close to allied spawn. Basically you have to shut down the allied spawn exits to cap the fuel dump, it is the obvious key to the whole map. The fuel truck has better protection so leave that to last as it stretches the allied defence giving them 2 objectives to worry about not one.
Best Sturmbot waypoints (INsane's 2019 opinion): Martee's set from 2019, grab them here.
Also good were The official Sturmbot 1.6 team. I finally have a set from that official waypointing team that isn't broken from a map change. Godcha also has a good set of waypoints and both play well. I honestly could not tell the difference between the two. Martee's had a slight advantage over the other two and seeing he is active and if issues are found, his set is best to use.
Waypoint Hint: The key is the same as the map hint, grab the fuel dump first. Control the bots by spamming the "I need back up" voice command. The bots need to overwhelm each objective as a near entire team. For the standard voice command: Press key “V” then “3” for the “I need backup” voice back up command. Consider a bind to a key for that voice command like… bind "i" "voice_backup"
 |
 |
| dod_kraftstoff - The flag overview | dod_kraftstoff - Routes on the minimap |
 |
 |
|
The American Fuel Dump (Right of Allied spawn) 2 Players, wait close to the fuel dump 8 Seconds |
The American Fuel Truck (Left of Allied spoawn) 2 Axis Players, wait close to the fuel truck 8 Seconds |
Map Author: Chris "Unreal" Scott. Chris is from Auckland - New Zealand. Here is an interview in 2003. His last entry in the dodhq archived web page is here. His maps are here.
Author text in game:
October, 1944, Deep in Allied territory
German forces, on a major offensive, have discovered an Allied fuel dump. Low on fuel for their tanks, the Axis troops decide to capture the town's supplies.
Allied Objectives:
- Defend the Fuel Truck
- Defend the Fuel Dump
Axis Objectives:
- Capture the Fuel Truck
- Capture the Fuel Dump
The map starts with 5 flags and all of them are neutral.
Allied team (US) have a fountain near the left spawn exit called "The Church Square" and further on near a second burning tank the second allied flag called "The Stronghold" is inside a building on the third floor level. Both of these are 1 Player - 1 Second walk through flags.
There is a Bridge in the centre of the map, it requires 1 player and 4 seconds to cap.
Axis team has the same, starting just outside the spawn there is a flag called "The Field", the next is found by taking the left route from there, just past a car there is "The Axis Street". Like the Allies those are 1 Player - 1 second walk through flag captures.
There are bazooka's enabled as a class and they are in both spawns, they are of limited value unless you are looking to blow up some camper rooms (all on the second story of buildings)... along with the camper of course.
Files in the dod folder: Ensure - mp_spawnbazookas 1 - is set in your dod/dod_caen.cfg file or the bazookas will not spawn. I do have a fix for this bug if you are interested.
It suffers some current bugs where the bazooka's don't spawn, I tried to explain that here. For this map Bazooka's are not requied to cap the map, but it sure is fun blowing up campers.
Hint: Unlike other 5 flag maps, the middle bridge can be taken by one player in 4 seconds, it is a matter of dominating all the areas so a good mix of fast moving players and MG support can be successful, a couple of good mobile snipers close to forward players helps on the last flag.
Best Sturmbot waypoints (INsane's 2019 opinion): Martee. His set still had issues as all tested did, see below. I tried the Official 1.6 set, one from Godcha, Sturmmann74 and Martee. All failed to pick up bazooka's in spawns and even though there are destructible walls no bazooka target or pick up weapon waypoints = no bot will pick up a spawn bazooka and blow a wall. All waypoints had route issues around allied second and the water around the bridge. I think a fresh set should be made, in saying that Martee's set are good enough for me if you note the below hint.
Waypoint Hint: With all waypoints I tried I found you really had to spam the "I need back up" voice command to get the bots past the bridge area, once you do that they will go for the last two flags.
 |
 |
| dod_merderet - The flag overview | dod_merderet- Routes on the minimap |
 |
 |
 |
 |
|
The church square (US 1st) 1 Player 1 Second |
The stronghold (US 2nd) 1 Player 1 Second |
The Bridge (Middle) 1 Player 4 Seconds |
The Axis Street (Axis 2nd) 1 Player 1 Second |
 |
 |
 |
 |
|
The Field (Axis 1st) 1 Player 1 Second |
Bazooka wall 1 Axis side Before Bridge |
Bazooka wall 2 Axis side Beside Bridge |
Bazooka wall 3 Allied side Before Bridge |
Map Author: Arjan "IR" Bak His Linked In page is here.
Author text in game:
German troops are attempting to regain a foothold against
the invading Allied forces - in order to do so, they need
to capture a key bridge.
Allied Objectives:
- Capture the 5 flag points
Axis Objectives:
- Capture the 5 flag points
This map has 5 flags, one middle capture area flag that takes 2 players - 3 seconds to cap and each side starts the round owning their 1st and 2nd flags closest to their spawns. Those 1st and 2nd flags outside both spawns are a 1 player - 1 second capture "walk through the flag".
Its a very twisting, tight street map that really tests your navigation skills, it takes some route learning so to get the best out of it you should study the minimap well. Its design is well thought out and it feels evenly balanced no matter what side you are on.
It could be regarded as the best looking map of all standard day of defeat maps. It has some damaged areas but for a dod map it would win the "Tidy Town" award for sure.
Read the "Map Author" information below, obviously a very talented level designer.
Hint: Learn the routes, its complex and there is an advantage if you know an alternative route to attack an enemy flank. In this map there is no long side routes off a main route, nearly every turn there is an option to go left or right.
Best Sturmbot waypoints (INsane's 2019 opinion): Martee. The only other set was from "Piper" and there were a couple of places where bots get stuck in buildings.
Waypoint Hint: The last flag on both sides look like a hard capture. The bots need direction to push up and go for flags so as with so many maps... move as far forward as you can and spam that "I need back up" to get the bots moving up.
 |
 |
| dod_northbound - The flag overview | dod_northbound - Routes on the minimap |
 |
 |
 |
|
1st - Allied Church Area 1 Player 1 Second |
2nd - Allied Main Road 1 Player 1 Second |
The Central Area 2 Players 3 Seconds |
 |
 |
 |
|
2nd - Axis Main Road 1 Player 1 Second |
1st - Axis Church Entrance 1 Player 1 Second |
The Map overview With flags |
Map Author: Arttu "skdr" Maki - Arttu is from Finland and his portfolio is interesting, in a Mapcore.org page it shows he worked on the early levels of Angry Birds. His Linkin page shows he is Co-Founder at Futureplay Games. Very impressive and his other work is quite comprehensive.
Author text in game:
January 20, 1945, Northern Front
After the successful operation in the western front,
allied troops called for more backup to the north.
Forces have to capture unknown urban
area and advance through a countryside
town to the center of the city.
Allied Objectives:
- Capture all 5 points
Axis Objectives:
- Capture all 5 points
This map has five capture points. One middle neutral capture zone and each side starts the map with 2 capture points owned by them at the map start.
On the Allied Side just outside of spawn there is "The Jeep" further on just before the middle capture, "The Car". There is a central capture that is neutral at round start call "The Bridge". On the Axis side the first two capture zones are "The Pak 37" outside the spawn and "The Tiger" (tank) just before the bridge. The bridge takes 2 players - 4 seconds to cap and all the rest are 1 player - 2 second capture zones.
There is a good main route, a side route that acts more like an alternative main route that snakes under the central cap zone "The Bridge". Both sides have a side route around their first and second capture zones with the Allied team having a side route on both sides in their zone and Axis only having one side route in their area. It seems unbalanced when saying that but it does work.
Hint: The middle Bridge area can get very busy, there are lots of spots for MG and snipers, the centre area has a decent distance for rifles, if you choose the smg's like a Thompson you may want to avoid the bridge area and try the twisty side routes. As always it is best to hold the Bridge and the last flags can be really hard... unless you hide in a side route and make a mad dash for that 2 second capture.
Best Sturmbot waypoints (INsane's 2019 opinion): Martee's set from 2019, download here. He was working on all standard maps and again his waypointing style is unlike most coming from the 2002-2004 official team. His sets do not have a lot of return paths the official waypointing team placed in the older sets. This style avoids (some not all) the issue of the bots not moving forward and even returning to spawn! It takes more time to lay down the waypoints but the extra effort pay off.
Others were Godcha's 2003 set, I tried three and all were broken, that was caused by a map upgrade where flags were removed and capture zones placed in. Out of all the broken ones I found Godcha's from his Golden Pathways vol 1 set to be the best so I repaired them, removing out of place waypoints and installing the required capture zones. There was also a displaced Ladder causing much drama for the Axis spawn. Also quite a few others had to be changed because of the new map structure.
Waypoint Hint: The bots have lots of route options and they do use them, Sturmbot's will take the shortest route and its hard to stop them getting to the Bridge and slugging it out. Cap outs by their own are very rare. If you see one or two go down a side route, follow them and use the voice commands to get them to follow you. Dump them off around the 2nd last capture zone and go for the last flag on your own. Disrupting the bots around their first flags makes them concentrate on the Bridge less, once they do your side may advance past the bridge and pressure the second capture zone, pick your time and get the last capture area.
Reducing the server side to 16 players or under I found the issues help the map flow better.
 |
 |
| dod_saints - The flag overview | dod_saints - Routes on the minimap |
 |
 |
 |
 |
 |
|
The Jeep 1 Player 2 Seconds |
The Car 1 Player 2 Seconds |
The Bridge 2 Players 4 seconds |
The Tiger 1 Player 2 Seconds |
The Pak 37 1 Player 2 Seconds |
Map Author: Arjan "IR" Bak His Linked In page is here.
Author text in game:
1943, Sicily
After being pushed out a key village in the hills of sicily,
the Allies prepare a counterattack; Operation: Saints.
The objectives are simple:
Allied Objectives:
- capture the bridge and reclaim the town!
Axis Objectives:
- Stop the americans from re-taking the bridge and the town
Basically, this is an upgraded version of dod_merderet.
The map starts with 4 "walk through -1 second" flags on both sides, the 1st and 2nd flags from each spawn is owned by that side and there is a central bridge that is a capture area type of 2 Players requiring 4 seconds to capture, the bridge starts the game as neutral.
Allied team (US) have a flag near the left spawn exit called "The Church" and further on near a destroyed Tiger tank a second allied flag called "The stronghold" situated in the awing area on the Ground floor. Both of these are 1 Player - 1 Second walk through flags. It is similar to dod_merderet but there is no fountain at the 1st flag and the 2nd flag isn't inside the building on the second floor.
There is a Bridge in the centre of the map, it requires 2 players and 4 seconds to cap, unlike the 1 Player - 4 seconds of dod_merderet.
Axis team has the same, starting just outside the spawn there is a flag called "The fields", similar to dod_merderet. The next is found by taking the left route from there, just past a car there is "The streets of blood". Like the Allies those are 1 Player - 1 second walk through flag captures.
There are differences in the layout all around the map, the allied spawn, the bridge area, there is a underground sewer side route from the bridge to the Axis flag areas but basically if you just played dod_merderet and played this one... you get that weird déjà vu feeling walking around it.
Hint: Play it like dod_merderet, try and use the "new" side routes, the Axis sewer route is good... if no one is camping it. The map is an improvement as far as a central bottle neck you see on dod_merderet. The bridge is more difficult to take than the former map so holding it is a key goal. A rifle is a good choice on this map, there are some long distances especially in the central bridge area.
Best Sturmbot waypoints (INsane's 2019 opinion): Martee from Oct 2019, download here. His first set had a small issue of a bot log jam on one route and it really hurt the axis side, he has addressed the issue and now this new set beat a set made by Gooofy in 2004.
Gooofy's 2004 are OK but Martee's set has a better flow. There isn't any official set.
Waypoint Hint: Bots like to slug it out on the bridge, try and get a squad of them to follow you around that bridge to Axis area sewer side route and get behind the enemy. Maps like this, it's best to reduce the server size to around 16 players.
 |
 |
| dod_sturm - The flag overview | dod_sturm - Routes on the minimap |
 |
 |
 |
 |
 |
|
The church 1 Player 1 Second |
The stronghold 1 Player 1 Second |
The bridge 2 Players 4 Seconds |
The streets of blood 1 Player 1 Second |
The fields 1 Player 1 Second |
Map Author: Arjan "IR" Bak His Linked In page is here.
Author text in game:
German troops are attempting to regain a foothold against
the invading Allied forces - in order to do so, they need
to capture a key bridge.
Allied Objectives:
- Capture the 5 flag points
Axis Objectives:
- Capture the 5 flag points
Textures:Daniel "kleinluka" Luka,
Scott "Kamikazi!" Jordan & Arjan "IR" Bak
The map is based on a central hill with a Church and Plaza in the centre (top of the hill). Both team spawns are at the bottom of each side of the hill.
There are 6 capture zones, 5 of them are 1 Player - 2 second caps and one in the Central Plaza that is a 2 Player - 4 second capture zone. The game starts with each team owning the 1st capture zone nearest their spawn.
This map is known for its central choke point at the top of the hill.
There are plenty of side routes before the Central Plaza/Church area at the top of the hill, just before you enter that top area the route becomes one intersection and then branches out to two routes again, those intersections are changeling to get through especially if MG and snipers are hiding in the church and destroyed buildings on both sides of the plaza.
Hint: It is critical to control of the top of the hill (MG/Snipers) and your opposing sides intersection (entry to the Central Plaza/Church area) then use the abundant side routes (preferably with smg's) to get to the last two flags.
Best Sturmbot waypoints (INsane's 2019 opinion): Martee from October 2019, download here.
The other set I had came with the Version 1.7 install, they are not signed, I take it they are from the sturmbot team but the waypointing style looks like Godcha or Gooofy. They did contain small errors and I did some light edits until Martee made another set that works better.
Waypoint Hint: The bots will get down (rarely) to the last flags but they need help getting past the central area, the bots on both sides mostly use the main route so use the side routes more often to get to the last two flags... as you move forward through the buildings use the voice command "I need back up" to get them moving forward. Like other maps that have a choke point reduce the players on the server is the best fix, 8-16 players is best for flow if the bots have complicated buildings to get through, but in saying I had fun on a 32 player server... cap outs are extremely rare with that amount of players, online or with bots.
 |
 |
| dod_switch - The flag overview | dod_switch - Routes on the minimap |
 |
 |
 |
|
Allied Base (1st) 1 Player 2 Seconds |
Allied Plaza (2nd) 1 Player 2 Seconds |
Central Plaza (mid) 2 Players 4 Seconds |
 |
 |
 |
|
Church (mid) 1 Player 2 Seconds |
Axis Plaza (2nd) 1 Player 2 Seconds |
Axis base (1st) 1 Player 2 Seconds |
Map Author: Jeremy "Izuno" Miller - In his linked In page he notes he was working with VALVe as a "Freelance game/level designer" Nov 2001 – Feb 2003. Also worked on Call of Duty as a Producer. He is still in the game industry in a consulting role and has his own company, Strategic Game Consulting.
Author text in game:
Late September, 1943, Italy
Intense fighting continues in the mountains of Italy. This town with switchbacked streets is a key strategic point in the Allied advance.
Allied Objectives:
- Capture the 6 flag points
Axis Objectives:
- Capture the 6 flag points
The map has four objectives, at map start two jeeps owned by the Allied team and the Axis team have a King Tiger Tank and a Half Track. All of these objectives are situated just outside Allies or Axis spawn exits.
The map is divided into 3 areas, an Allied side, an Axis side and a large centre area with a canal in a horseshoe shape. There is a large building off the canal and that provides some cover and another route to the opposing sides area. Entry to the enemy area on the building side of the central area is blocked by barricades, there are satchel charges in spawn to blow these and open up that route.
There are destructible walls along "The Sniper Ledge" in the central area adjacent to the canal. You will need a Bazooka to blow these up.
This map cannot be capped without Bazooka's, you must be in that class to cap out. There are many bazooka's provided in both spawns for this reason. Note the next section as there is a known issue for bazooka's spawning on a map, you may need to adjust some game files if playing offline bots or configuring a online server.
Files in the dod folder: Ensure - mp_spawnbazookas 1 - is set in your dod/dod_vinenza.cfg file or the bazookas will not spawn. I do have a fix for this bug
It suffers some current bugs where the bazooka's don't spawn, I tried to explain that here. Without bazooka's this map is kind of pointless as they are used to cap the map out in all object captures.
Hint: Blow the barriers in the central areas, don't forget your satchel charge in spawn. Consider bazooka class if you are keen on capping the map. Learning the maps routes will provide some options but this map can become a choke point around the enemy zones and central border.
Best Sturmbot waypoints (INsane's 2019 opinion): The best set is from Martee Oct 2019, download here. Martee had these for a long time, the bazooka issue with sturmbot were holding them back. After we looked into the issue on dod_jagd these were fixed in no time at all.
Others, avoid. They do not have the fix in the waypoints and bots cannot cap the map.
Waypoint Hint: The map is nuts at 32 players, best to reduce the size to 8-16 players. The bazooka class the bots use is reliant on your dod folder files, if they are not set correctly then the bots will not have bazooka's required to cap out.
 |
 |
| dod_vicenza - The flag overview | dod_vicenza - Routes on the minimap |
 |
 |
 |
 |
|
The South Jeep 1 Bazooka round |
The West Jeep 1 Bazooka round |
The King Tiger 1 Bazooka round |
The Halftrack 1 Bazooka round |
 |
 |
 |
 |
| Axis Barrier | Allied Barrier | Central area to Axis side | Central area to Allied side |
Map Author: Jeremy "Izuno" Miller - In his linked In page he notes he was working with VALVe as a "Freelance game/level designer" Nov 2001 – Feb 2003. Also worked on Call of Duty as a Producer. He is still in the game industry in a consulting role and has his own company, Strategic Game Consulting.
Author text in game:
April, 1945, Italy
The Allies have advanced up the rocky spine of Italy, nearly to the city of Vicenza. Tanks have fired shells from a distance, but before they can roll into the city the King Tiger tank must be destroyed.
Allied Objectives
- Destroy the King Tiger with Bazookas or satchel charges.
- Prevent the Axis troops from destroying the two Allied jeeps.
Axis Objectives
- Destroy the Allied Jeeps with Panzerschrecks or satchel charges.
- Prevent the Allies from destroying the King Tiger tank.
This map is basically along the same lines as dod_glider, Axis are defending capture zones and objects, Allies need to take them and they have a time limit of 10 Minutes or the Axis side wins. You really have to have a good Allied side to win this map... its the hardest map in dod to take for the allied team.
The map starts with half of it locked off to both teams, the 3 tanks and church cannot be accessed.
The fountain (just outside Axis spawn building) is captured by 1 Allied player standing in the fountain for 4 seconds. If an Axis player is just outside the fountain then it blocks the Allied capture.
After the fountain is taken there is a bombing raid around the fountain and other parts of the map, the spawns now adjust, the Axis are no longer in the building near the fountain they are way over at the church, The Allied team spawn adjusts to the building lose to the fountain and near the now unblocked part of the map containing the 3 tanks and the church.
As the Allied team set off in the new spawn there is a main route and some side routes can be accessed by turning to the left and standing near a beacon, step away as a plane comes in and blows the wall near it. There is also a wall that can be blown up to access an other route near that beacon.
The Allied team then takes the 3 tanks (2 bazooka round per tank) and the church by standing on the church steps for 4 seconds.
Hint: OK, I told you what is supposed to happen, and don't forget this all happens for the allied side in 10 minutes.
Now I can be honest because the hints are more about the best way to win the map. Truth is the Allied team don't ever win unless the Axis team all decide to have a quick coffee break, all at the same time, on map start.
If you have ever played this on an online public server you likely have never seen the other side of the map that has the 3 Tanks and the Church. The only hint I can give is grab a map config file and cut the Axis side by half or give them all pistols in a server plugin.
It normally ends up with both sides practising their sniper skills (if there is such a thing) and the Allied team not capping the fountain. I have yet to meet a dod player who thinks this is a good map.
Sure, its very clever, its well thought out and unique. Its unfortunate that it has completely been spoiled, if the fountain was placed half way from each spawn, the timer set to 15 minutes, the map would have worked. Such a pity.
Files in the dod folder: Ensure - mp_spawnbazookas 1 - is set in your dod/dod_zalac.cfg file or the bazookas will not spawn. I do have a fix for this bug
It suffers some current bugs where the bazooka's don't spawn, I tried to explain that here. Like other maps of this type, without bazooka's this map is kind of pointless as they are used to cap the map out in all object captures.
Best Sturmbot waypoints (INsane's 2019 opinion): The best set is from Martee Oct 2019, download here. Like dod-vicenza Martee had these for a long time, the bazooka issue with sturmbot were holding them back. After we looked into the issue on dod_jagd these were fixed.
Waypoint Hint: The map can go up to 32 players. The bazooka class the bots use is reliant on your dod folder files, if they are not set correctly then the bots will not have bazooka's required to cap out.
Past that, there is a command in Sturmbot that may help.
observer [on/off] This will make bots ignore all human players. (Handy for waypointers for testing purposes)
Place "observer on" in console, grab a knife, walk up to the fountain and take it. The Axis bots will ignore you if one is in the way... you have a knife.
Even then the odds of taking the rest of the objectives... good luck with that. Its called cheating, no one will judge you on your local LAN.
So, all that may seem negative. I prefer to be honest and only trying to help. This map is obviously bias and way too hard to be taken seriously.
Google "dod_zalec" see how many fan pages you get.
 |
 |
| dod_zalec - The flag overview | dod_zalec - Routes on the minimap |
 |
 |
 |
 |
|
Blow this door Exrta route to Fountain. |
Axis Fountain 1 Player 4 Seconds in the Fountain |
Fountain taken - Bombs Old routes are now cut. Routes to tanks open. |
Gate is blown after air strike The route is now open to the new section |
 |
 |
 |
|
|
Stand near this beacon. It calls in a Air Strike The wall bombed - new route |
Blow this wall
New route to 3 Tanks
|
Tank 1 and 2 2 X bazooka rounds |
Tank 3 and Church Stand on the steps 4 - Seconds |
Map Author: Patrick "Mojo" Krefting. Patrick's portfolio page is here. He is currently at Retro Studios.
Author text in game:
January, 1945, Western Front
Paratroopers have landed near the city of Zalec with the objective of capturing the town and removing all German resistance.
Allied Objectives:
- Capture the fountain near the clock tower
- Destroy the three Axis Panzers
- Capture the Zalec church
Axis Objectives:
- Defend the fountain
- If the fountain is captured, fall back to the Panzers
- If the tanks are destroyed, fall back to the church
Allied - US Classes - On selected maps.
Axis - German Classes - On all maps
Allied - British Classes - On selected maps.
Primary Weapon: Garand Rifle
Primary Ammo Loadout: 11 clips, 8 rounds each
Secondary Weapons: Colt Pistol, Knife
Grenades: 2
The Rifleman, aka "light infantry" is a good, all-around class who is deadly at both long and short range. Not as effective in the move in assaults however.

Operation: Semiautomatic
Caliber: .30-06 Rifle
Capacity: 8 round clip
Weight: 9.5 lbs
Named after its inventor, John C. Garand, the "U.S. Rifle, Caliber .30, M1" was developed throughout the 20's and 30's, finally entering military service in 1936. It was designed to be mass produced, and easily cleaned in the field. The final product was an accurate, reliable, efficient rifle that was easily the best semi-automatic weapon used by any country during the war.
Game Tips: The distinctive 'ping' sound of a Garand clip being ejected can be heard by nearby players and is a dead giveaway to the enemy that you're out of ammo. Keep in mind that if you do run out of ammo, you can always hit enemy players with the butt of your weapon using the 'secondary fire' key.
Primary Weapon: M1 Carbine
Primary Ammo Loadout: 11 clips, 15 rounds each
Secondary Weapons: Colt Pistol, Knife
Grenades: 1
The Staff Sergeant is a class designed for assaults, as well as close-in engagements. With the lighter recoil of the M1 Carbine, this class can hit targets quickly and accurately. This class is ideal for short range inner city fighting.

Operation: Semiautomatic
Caliber: .30 Carbine
Capacity: 15 round box magazine
Weight: 5 lbs
Carbine/Folding-Carbine: The M1 Carbine, or ".30 Cal. Carbine" was manufactured in greater numbers than any other American military firearm during the war. The basic premise of the weapon was to arm rear-echelon troops (normally only armed with pistols, if anything) who could not be bothered to carry heavier rifles and machineguns. This was especially important considering World War II was so much more mobile than World War I - troops behind the front line could be assaulted by the enemy without any notice.
Game Tips: The .30 Carbine round is not the same round used in other .30 caliber weapons – it is shorter, and much weaker. Most enemies will require several hits to be taken out.

Operation: Semiautomatic
Caliber: .30 Carbine
Capacity: 15 round box magazine
Weight: 5 lbs
The M1 folding stock Carbine is essentially the same weapon as the M1 Carbine. It was fitted with a folding stock and crude pistol grip, making it very useful for Airborne troops who had trouble carrying larger weapons.
Game Tips: The .30 Carbine round is not the same round used in other .30 caliber weapons – it is shorter, and much weaker. Most enemies will require several hits to be taken out.
NOTE: You will get this instead of the normal Carbine if you are on Para Maps with US teams.
Primary Weapon: M1A1 Thompson
Primary Ammo Loadout: 7 clips, 30 rounds each
Secondary Weapons: Colt Pistol, Knife
Grenades: 1
The Master Sergeant is a class designed for assaults, as well as close-in engagements. With the Thompson, he can 'spray and pray'. This class is ideal for short range inner city fighting.

Operation: Automatic
Caliber: .45 ACP
Capacity: 30 round box magazine
Weight: 11 lbs
The Thompson submachine gun, or "Tommygun" as it was called by the troops, wasn't initially accepted into the US Army. The development of the Carbine and Garand superceded research of any submachine gun, so it wasn't until after Pearl Harbor that the Army saw a use in the weapon - in fact, early versions of the Thompson were used by British troops before they were used by Americans. The weapon wasn't as easy or cheap to manufacture, however, and was eventually replaced by other weapons late in the war.
Game Tips: The Tommygun can be devastating at short range – aim low and fire in long bursts – the recoil will drag your fire upwards across your target.
'Primary Weapon: M3A1 ‘Greasegun’
Primary Ammo Loadout (Thomspon): 7 clips, 30 rounds each
Primary Ammo Loadout (Carbine): 11 clips, 15 rounds each
Secondary Weapons: Colt Pistol, Knife
Grenades: 1
The Sergeant is a class designed for assaults, as well as close-in engagements. With the Greasegun, he can “spray and pray”.

Operation: Automatic
Caliber: .45 ACP
Capacity: 30 round box magazine
Weight: 9.9 lbs
Considering the manufacturing problems of the Thompson, the Ordnance Department began to look for a cheaper replacement as early as 1941. Numerous trials were held, including tests of the British "Sten" submachine gun. The overall winner of these tests was dubbed the "M3A1 Submachine gun", or "Greasegun." The weapon was made entirely of stamped metal, making it incredibly cheap and easy to mass produce. The Greasegun was supplied to troops that could not get a Thompson, and was especially popular with tank crewman, since its small size allowed it to fit inside crew compartments.
Game Tips: The M3A1 Greasegun is nearly identical to the Thompson, the main difference being the Greasegun’s slower rate of fire. Although it doesn’t spray as much lead as the Thompson does, its slower rate of fire allows a player to conserve ammunition. The Greasegun is very useful in the prone firing position – its accuracy will allow an easy headshot.
Primary Weapon: Springfield Sniper Rifle
Primary Ammo Loadout: 11 clips, 5 rounds each
Secondary Weapons: Colt Pistol, Knife
Grenades: None
The Sniper is a tricky class to play. Although he requires team support on the move, once he’s found a good position, he can hold his own against entire squads of enemies.

Operation: Bolt-action
Caliber: .30-06 Rifle
Capacity: 5 round stripper clip
Weight: 9.38 lbs
US military forces had no official sniper rifle at the beginning of the war. To meet the demand, the Ordnance Department ordered that the M1903A3 rifle be converted for the job. The resulting weapon, designated M1903A4, was the only mass-produced sniper rifle of the war. Although it was not a true, dedicated sniper rifle, it served its purpose and performed reasonably well.
Game Tips: Crouching and laying on the ground will help eliminate the “sway” encountered while zoomed in. Standing and firing is very difficult with this weapon.
Primary Weapon: Browning Automatic Rifle (BAR)
Primary Ammo Loadout: 12 clips, 20 rounds each
Secondary Weapons: Colt Pistol, Knife
Grenades: 1
The Support Infantry is a hybrid of the Rifleman and Sargeant classes. His BAR packs enough firepower and accuracy to be deadly at almost any range, although his clip capacity and slower speed limit him on assaults.

Operation: Automatic
Caliber: .30-06 Rifle
Capacity: 20 round box magazine
Weight: 18.5 lbs
The Browning Automatic Rifle first saw use in World War I. At the time, its twenty round magazine and automatic fire capability bridged the gap between the rifle and machinegun. It was so popular that almost every other Allied country requested it throughout the war. It maintained this role through the second World War, its only drawbacks being the lack of a quick change barrel, and its limited magazine capacity. Despite these shortcomings, it was constantly being requested in numbers that could not be produced, especially during the Pacific campaign.
Game Tips: The BAR’s heavy recoil and low magazine capacity will make long range automatic fire useless. Fire in 2-3 shot bursts for the best effectiveness. Its primary usage is in support - bipod down, firing at medium to long range. You can also deploy the BAR’s bipod for maximum accuracy.
Primary Weapon: .30 Caliber Machine Gun
Primary Ammo Loadout: 2 boxes, 150 rounds each
Secondary Weapons: Colt Pistol, Knife
Grenades: None
Like the Sniper, the Machine Gunner requires the support of teammates to be effective. On the move, his undeployed weapon is virtually useless. Once in position, a good Machine Gunner can decimate anything unfortunate enough to be in its path. Once a Machine Gunner runs low on ammo, however, he will need a teammate to pass ammo boxes.

Operation: Belt-fed, automatic
Caliber: .30-06 Rifle
Capacity: 150 round belt
Weight: 32.5 lbs
Initially developed only as a tank-fitted weapon, The M1919A4 .30 Caliber Light Machinegun eventually filled a role that was missing in a typical US infantry squad - a mobile machinegun. The Machineguns in use at the time were developed before World War I and could only serve a defensive, static role because of their weight. The M1919A4 was light enough that it could move with the squad and be setup with tripod or bipod at a moment's notice. It was light enough to even be dropped with paratroops, who's minimal loadout usually lacked firepower.
Game Tips: The 30 cal has a reasonable rate of fire and a large supply of ammo – making sustained suppressive fire very useful with this weapon.
MG Usage: Machineguns are nearly useless when not deployed. Go ‘prone’ and hit ‘secondary fire’ to deploy your bipod. (Or, find an ‘MG nest’ to deploy the bipod while standing.)
Primary Weapon: Bazooka rocket launcher
Primary Ammo Loadout: 6 Bazooka shells
Secondary Weapons: Colt Pistol, Knife
Grenades: None

Operation: Hand-loaded shells
Capacity: 1 rocket
Weight: 30 lbs
Developed later in the war, rocket weapons were the perfect instrument to destroy tanks and vehicles. They could also be used in certain situations to blow holes into walls, providing either an improvised escape or attack route.
Game Tips: The Bazooka is useful in many places for blowing holes in damaged walls or for completing objectives.
Bazooka Usage: The Bazooka must be deployed to fire. Hit ‘secondary fire’ to shoulder your bazooka.
Airborne troops will only appear on “Para” maps. Paratroopers can select from any normal weapon, as well as paratrooper-specific weapons. (The Greasegun and folding stock Carbine) Like normal classes, they carry a number of grenades depending upon the primary weapon that they choose. (click to go back to folding cabine section)
Primary Weapon: Karbiner 98k Rifle with Bayonet
Primary Ammo Loadout: 13 clips, 5 rounds each
Secondary Weapons: Luger Pistol, Spade
Grenades: 2
Like the Allied Rifleman, the Grenadier is a very versatile class. In addition to his accurate, powerful rifle and attached bayonet, he also has two grenades with which to cause havoc.

Operation: Bolt-action
Caliber: 8mm Mauser
Capacity: 5 round stripper clip
Weight: 8.5 lbs
The Karbiner series of rifles were issued to most German infantrymen throughout World War I and II. It proved reliable through both wars: delivering heavy rounds at long ranges, with great accuracy. An attachable bayonet was also included as standard issue.
Game Tips: In addition to the K98’s great accuracy at long ranges, the bayonet can be a very effective weapon in close quarters – hit the ‘secondary fire’ key to use it.
Primary Weapon: Karabiner 43
Primary Ammo Loadout: 8 clips, 10 rounds each
Secondary Weapons: Luger Pistol, Spade
Grenades: 2
The Stosstruppe class carries Germany's reply to the US M1Garand and Soviet SVT40 rifles, the K43 provides this class with semi-automatic one-shot-kill capability. After learning to control the K43's recoil, this weapon and can turn the tide of a battle.

Operation: Semiautomatic
Caliber: 8mm Mauser
Capacity: 10 round box magazine
Weight: 8.6 lbs
Throughout 1941-1942, the German Army’s standard issue rifle, the K98k, simply could not compete with Soviet semi-auto rifles in sheer volume of fire. To answer that discrepancy, Germany engineered a semi auto rifle of its own. Although it was never produced in the numbers suitable to equip all frontline troops, the K43 (Also known as the ‘G43’) proved to be an effective weapon, especially in the sniper role.
Game Tips: The K43 is very similar to the Garand in performance – great for medium/long ranges, not quite as effective close-in.
Primary Weapon: MP40 Machine Pistol
Primary Ammo Loadout: 7 clips, 31 rounds each
Secondary Weapons: Luger Pistol, Spade
Grenades: 1
Like the Allied Sargeant, the Unteroffizier is a class designed for assaults, as well as close-in engagements. This class is very similar to the Scharführer class, although the MP40 trades damage for reduced recoil.

Operation: Automatic
Caliber: 9mm Parabellum
Capacity: 31 round box magazine
Weight: 8.7 lbs
A new type of weapon was required for a new type of war - blitzkrieg. Although the K98 was a fantastic bolt-action rifle, it could not produce the volume of fire required in every situation. The 'submachine gun' filled a role between rifle and machinegun, and the MP40 was one of the first true submachine guns.
Game Tips: Like the Tommygun, the MP40 is one of the few guns that can be used effectively on the run – although accuracy is poor while moving, the MP40’s volume of fire will usually keep it effective.
Primary Weapon: Sturmgewehr 44
Primary Ammo Loadout: 7 clips, 30 rounds each
Secondary Weapons: Luger Pistol, Spade
Grenades: 1
The Sturmtruppe class carries the first true assault rifle in history, this class can perform almost any role with effectiveness. The Stg44's medium sized round provides knock down power while keeping recoil to a minimum. The Stg44 is best used firing in short 2 to 3 shot bursts.

Operation: Automatic
Caliber: 8mm Kurz
Capacity: 30 round ‘banana clip’
Weight: 11.5 lbs
The MP44 assault rifle was easily one of the biggest achievements in history for the modern infantryman. The first ever of its kind in that it used a shortened rifle cartridge – more powerful than standard pistol ammo, but not so powerful as to become uncontrollable in sustained fire. The MP44, if production had continued, would have replaced every rifle and submachine gun in the German Army.
Game Tips: The MP44 is a good weapon all-around. Its accuracy is slightly better than the SMG’s, so can be used at both long and short range.
Primary Weapon: Karbiner 98k Sniper Rifle
Primary Ammo Loadout: 13 clips, 5 rounds each
Secondary Weapons: Luger Pistol, SS Knife
Grenades: None
The Scharfschuetze is a tricky class to play. Although he requires team support on the move, once he’s found a good position, he can hold his own against entire squads of enemies.

Operation: Bolt-action
Caliber: 8mm Mauser
Capacity: 5 round stripper clip
Weight: 11 lbs
The standard German infantryman’s weapon was easily adapted as a sniper rifle with a simple “High Turret” scope attachment.
This versatility was one of the reason’s the K98’s service life was so long.
Game Tips: Crouching and laying on the ground will help eliminate the ‘sway’ encountered while zoomed in. Standing and firing is very difficult with this weapon.
Primary Weapons: MG42 Machine Gun, or MG34 Machine Gun
Primary Ammo Loadout (MG42): 2 boxes, 250 rounds each
Primary Ammo Loadout (MG34): 5 cans, 75 rounds each
Secondary Weapons: Luger Pistol, Spade
Grenades: None
The Machine Gunner was the backbone of German Military doctrine, and in turn the MG-Schütze is very important to any squad. Like its allied counterpart, the MG-Schütze requires support on the move, and extra ammunition once it's deployed. Although the MG42 provides more raw firepower, the MG34 trades clip capacity and rate of fire for accuracy and lighter recoil.

Operation: Belt-fed, automatic
Caliber: 8mm Mauser
Capacity: 75 round ‘assault’ drum
Weight: 26.6 lbs
The MG34, like so many other German weapons, was truly revolutionary. The MG34 was the world's first machinegun that could keep up with the standard infantry squad - light enough to be carried by a single man. It was also versatile in that it could be switched from an LMG, to a MMG, to a HMG depending on what add-ons it had.
Game Tips: The MG34 has the best accuracy of all the MG’s – it will retain some effectiveness undeployed and on the move, although a deployed position is still recommended.
MG Usage: Machineguns are nearly useless when not deployed. Go ‘prone’ and hit ‘secondary fire’ to deploy your bipod. (Or, find an ‘MG nest’ to deploy the bipod while standing.)

Operation: Belt-fed, automatic
Caliber: 8mm Mauser
Capacity: 250 round belt
Weight: 25.3 lb
Although the MG34 was revolutionary, it did have problems, including extreme sensitivity to dust and dirt. The answer to those problems was the MG42 - a weapon that became known for its extreme reliability and combat effectiveness. Its rate of fire was so fast that allied troops learned to fear the sound that it made - somewhat like that of canvas ripping since the bullet reports were so close together.
Game Tips: The MG42 has the highest rate of fire of any weapon in the game. You will overheat its barrel if you don’t control your fire.
MG Usage: Machineguns are nearly useless when not deployed. Go ‘prone’ and hit ‘secondary fire’ to deploy your bipod. (Or, find an ‘MG nest’ to deploy the bipod while standing.)
Fallschirmjager troops will only appear on a few maps. Paratroopers can select from any normal weapon, as well as paratrooper-specific weapons ( the FG42 ). Like normal classes, they carry a number of grenades depending upon the primary weapon that they choose.

Operation: Automatic
Caliber: 8mm Mauser
Capacity: 20 round box magazine
Weight: 9.9 lbs
The FG42 was designed specifically for paratroops. Its light weight and small size was perfect for airborne operations – yet, at the same time, its 20 rounds of 8mm Mauser would provide the firepower of a light machinegun in each rifle. The desired outcome wasn’t exactly reached, however, as the weapon’s light weight and short length was ill-suited for a full size rifle cartridge. The recoil was enormous, making sustained automatic fire impossible. The complexity of the design slowed production to a crawl – only 7000 of these weapons were ever made.
Game Tips: The FG42 is fairly useless at long range unless your bipod is deployed. Otherwise, the weapon is great for close-in work.
MG Usage: Go ‘prone’ and hit ‘secondary fire’ to deploy your bipod. (Or, find an ‘MG nest’ to deploy the bipod while standing.)
Operation: Automatic
Caliber: 8mm Mauser
Capacity: 20 round box magazine
Weight: 9.9 lbs
This weapon is identical to the previous FG42 except that it sports a scope rather than a bipod.
Game Tips: The FG42’s scope does not grant a huge bonus in accuracy like other sniper rifles – however, it does allow you to see the target area much more clearly and is thus suited more to the player who prefers to move rather than remain stationary.
Primary Weapon: Panzerschreck rocket launcher
Primary Ammo Loadout: 6 Panzerschreck shells
Secondary Weapons: Luger Pistol, Spade
Grenades: None

Operation: Hand-loaded shells
Capacity: 1 rocket
Weight: 30 lbs
Developed later in the war, rocket weapons were the perfect instrument to destroy tanks and vehicles. They could also be used in certain situations to blow holes into walls, providing either an improvised escape or attack route.
Game Tips: The Panzerschreck is useful in many places for blowing holes in damaged walls or for completing objectives.
Panzerschreck Usage: The Panzerschreck must be deployed to fire. Hit 'secondary fire' to shoulder your panzerschreck.
Primary Weapon: No4 Mk1 Lee Enfield
Primary Ammo Loadout: 11 clips, 10 rounds each
Secondary Weapons: Webley Pistol, Knife
Grenades: 2
The rifleman carries the No4 Mk1 Lee Enfield. It was one of the most accurate rifles during the war. Careful but quick aim is key with this class, learn to shoot for the upper half of the body and you will have success pushing the enemy back.

Operation: Bolt-action
Caliber: .303 Rifle
Capacity: 5 round stripper clips(two)
Weight: 8.8 lbs
The Enfield rifle was the standard issue rifle to all Commonwealth troops throughout the war. Unique to the weapon was the ability to load two full stripper clips - bringing the capacity up to 10 rounds instead of five. The Enfield was usually issued with a "spike" bayonet, but was commonly removed and discarded due to its poor design.
Game Tips: Use this weapon at long ranges (and from cover) if possible. The amount of time it takes to load a new round makes this weapon difficult to use in close quarters.
Primary Weapon: Sten Mk II
Primary Ammo Loadout: 7 clips, 30 rounds each
Secondary Weapons: Webley Pistol, Knife
Grenades: 1
This class is strong on the assault. The light recoil of the Sten is a key to his mobility on the battlefield. Being an excellent close in weapon, it was the choice for many commando's throughout the war.

Operation: Automatic
Caliber: 9mm
Capacity: 32 round box magazine
Weight: 6.5 lbs
At the breakout of the war, Britain had no submachine gun to speak of - Thompson subguns 'Tommyguns' were ordered/lend-leased throughout the early parts of the war. That proved too expensive, however, so plans were drawn up for a cheap, lightweight submachine gun that could utilize any 9mm ammo - including ammunition captured from German weapons. The Sten was the answer to that call - incredibly cheap, lightweight, and easy to use. It was popular with the troops as well as resistance fighters in France.
Game Tips: Like the other subguns, the Sten should be used primarily at short ranges. It's a perfect weapon for house clearing or street to street fighting.
Primary Weapon: Enfield No4(T) Sniper Rifle
Primary Ammo Loadout: 11 clips, 10 rounds each
Secondary Weapons: Webley Pistol, Knife
Grenades: None
Carrying one of the finest sniper weapons of the war, this class can stifle nearly any attack. Good positioning is the key to this class' survival, engage the enemy and move. Your muzzle flash will give you away if you stay in one spot too long.

Operation: Bolt-action
Caliber: .303 Rifle
Capacity: 5 round stripper clips(two)
Weight: 11 lbs
This weapon is a basic Enfield fitted with the Number 32 Telescopic Sight. It was official designated the Mark I(T) - only Enfields that were deemed the most accurate were fit for conversion to the sniper variant.
Game Tips: Crouching and laying on the ground will help eliminate the “sway” encountered while zoomed in. Standing and firing is very difficult with this weapon.
Primary Weapon: Bren Light Machine Gun
Primary Ammo Loadout: 6 clips, 30 rounds each
Secondary Weapons: Webley Pistol, Knife
Grenades: 1
Known for its outstanding reliability and power, the Bren machine gun was the mainstay for the Commonwealth forces in WWII. Used both as a light and heavy machine gun, the Bren gun this class uses is extremely adaptable to the situation and can be used in both the defensive and offensive roles.

Operation: Automatic
Caliber: .303 Rifle
Capacity: 30 round box magazine
Weight: 23 lbs
Originally a Czechoslovakian design, the Bren features a top-loaded 30 round clip, bipod, and easily changeable barrel. It was one of the world's first light machineguns and was arguably the best LMG of the war. Five versions of the Bren were designed, including a post-war model that used the standard 7.62 NATO round. Like the American BAR, it can be used in either a support or an assault role.
Game Tips: The Bren can be used in the assault role on the move, although its heavy recoil will make it harder to use than a submachine gun. Its primary usage is in support - bipod down, firing at medium to long range.
MG Usage: Go ‘prone’ and hit ‘secondary fire’ to deploy your bipod. (Or, find an ‘MG nest’ to deploy the bipod while standing.)
Primary Weapon: Piat rocket launcher
Primary Ammo Loadout: 6 Piat shells
Secondary Weapons: Webley Pistol, Knife
Grenades: None

Operation: Hand-loaded shells
Capacity: 1 rocket
Weight: 30 lbs
Developed later in the war, rocket weapons were the perfect instrument to destroy tanks and vehicles. They could also be used in certain situations to blow holes into walls, providing either an improvised escape or attack route.
Game Tips: The Piat is useful in many places for blowing holes in damaged walls or for completing objectives.
Piat Usage: The Piat must be deployed to fire. Hit ‘secondary fire’ to shoulder your weapon.